Hello, everyone!
This time I will share with you some different ways to create Scriptable Objects in Unity. I will try to also share with you different examples of how I did use these creation methods in my previous games.
If you are wondering, why you want to use a Scriptable Object, I think the best you can do is to check out the official Unity documentation for Scriptable Objects but here is a short list of how I am used to using them:
- Avoid data duplication by storing configs in one file
- Have setting files that anyone without coding knowledge can modify
- Make different sets of settings to playtest and be able to switch them during runtime
- Store reference to different kinds of sequences
- Have different levels with their editors as I did for YBit.
And these are only the most common ones for me, there are a lot more uses for them and your imagination is probably the limit since they are pretty useful!
Defining the Scriptable Object
First of all, in order to define a Scriptable Object class we will need to create a new one that inherits from Scriptable Object:
public class ScriptableObjectClass : ScriptableObject
{
        //Stuff
}
Once you have it, now you are to find a way to create the scriptable object. How you decide to create an instance of it will depend on your needs.
Three different ways of creating Scriptable Objects
There may be more than these particular three ways but I found these to be the most common for me and I think they are pretty useful for most, if not all, situations.
Manual instances with the CreateAssetMenu attribute
For example, if you are going to create these instances manually each time you want to create a new setting or behaviour, you can do the following:
[CreateAssetMenu(fileName = "NameOfTheFile", menuName = "My Scriptable Objects/ScriptableObjectClass")]
public class ScriptableObjectClass : ScriptableObject
{
        //Stuff
}
As you can see, here the scriptable object will have an attribute on it with the information:
- fileName – Name of the file when created
- menuName – Full path for the menu selection. Each / will add another inner level
And this will result in the following:
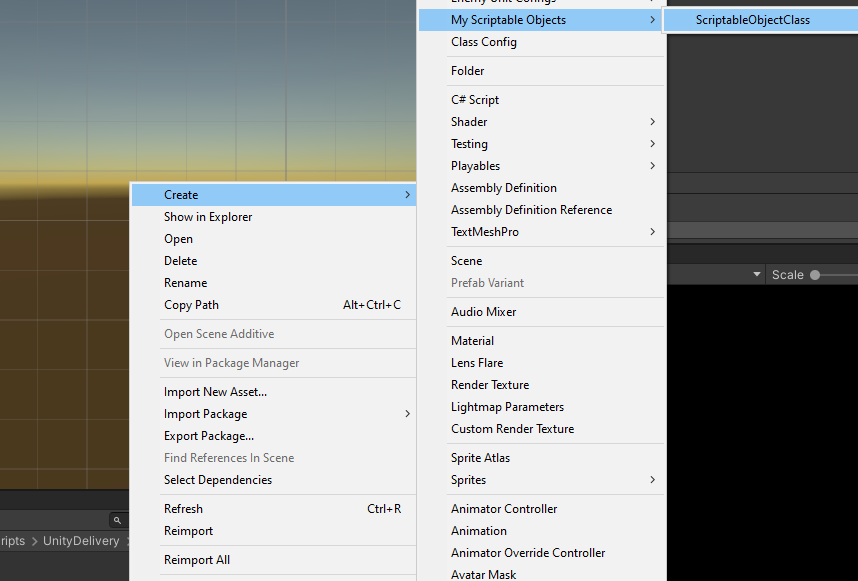
As you can see, with this attribute now when you do right-click in the Asset tab and go to Create you will find the full path to create it.
I am using this approach for my Dice game where I create class configs and unit configs. If you looked carefully, you can see that below the My Scriptable Objects option in the last screenshot there is a Class Config one for example 😉
Manual instances with the MenuItem option
The last option let you create a Scriptable Object just in the position where you did right-click. But, let’s suppose you just want to create it in one specific folder and even more, maybe you want it to override its values depending on external factors that default values can’t be hardcoded into the class. For this, we can do the following:
[MenuItem("ScriptableObjectCreator/CreateCustomScriptableObject")]
public static void CreateCustomScriptableObject()
{
var scriptableObject = CreateInstance<ScriptableObjectClass>();
//Do custom stuff you want to the ScriptableObject instance
AssetDatabase.CreateAsset(scriptableObject, "Assets/Custom/Path/filename.asset");
AssetDatabase.SaveAssets();
AssetDatabase.Refresh();
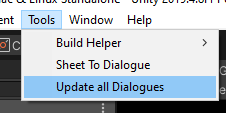
}Here we are using a MenuItem attribute for a static function. The value of the MenuItem is the path you will have at the top:

Then, inside, we are creating an instance of that ScriptableObject we defined before. We have a place to make the custom modifications we want to do and then we use AssetDatabase methods to save it at the path we want.
Make a tool that creates as many scriptable objects as needed
For this one, I don’t have extra code to show because it will really depend on your needs but I have an example of how it could work and maybe this approach brings ideas to you. As some of you may know, I am currently working on a visual novel called Summer Snow Day which has a ridiculous amount of dialogue. Like really, a lot.
To manage those dialogues, we have a huge amount of spreadsheets with all the input data which then we have as .csv files:

Because we are used to making a lot of modifications to these dialogues, we decided to create a tool:
This tool basically looks for all the dialogue files we have in the project and creates a scriptable object with the transcription of those in the needed folders leaving something like this:

Thanks to this, we are now able to update all the file dialogues at once and use all these scriptable objects in our game by loading them through resources without the need to manually assign them to anything.
Filling it with information
Now only the last step is left. The easiest way to use them is to start adding fields to the Scriptable Object class and then add a reference to a MonoBehaviour or load them through Resources.Load at a specific path. While these are not the only way to use them, they are certainly the most common ones.
If you have read up to down here, thank you very much for showing interest in this! Perhaps I make a new post with different ways of using them with examples.
So that’s all for now. Thank you and stay tuned!
One Reply to “How to create Scriptable Objects in Unity”